How do you prepare for an RV trip?
To prepare for an RV trip, decide on a destination or general direction, monitor weather trends along your potential routes, identify what is really needed for this specific trip, plan a menu, and complete the rig’s preventive maintenance items prior to departure.
Destination or General Direction
I discovered that there is more than one way to plan a route. My personal preference is to have a specific destination in mind and to know how long it will take to get there. When we have a specific destination and reservations are required, I like to create a travel envelope that organizes items we may need to reference along the way. I use a 9×12 envelope and collect hard copies of our confirmation emails, maps, things to do, and National Park and State Park passports. We can get to most of that online of course, but sometimes it is just easier and quicker to pull references out of the envelope.
It is more fun sometimes just to plan on a general direction and see where the road takes us.
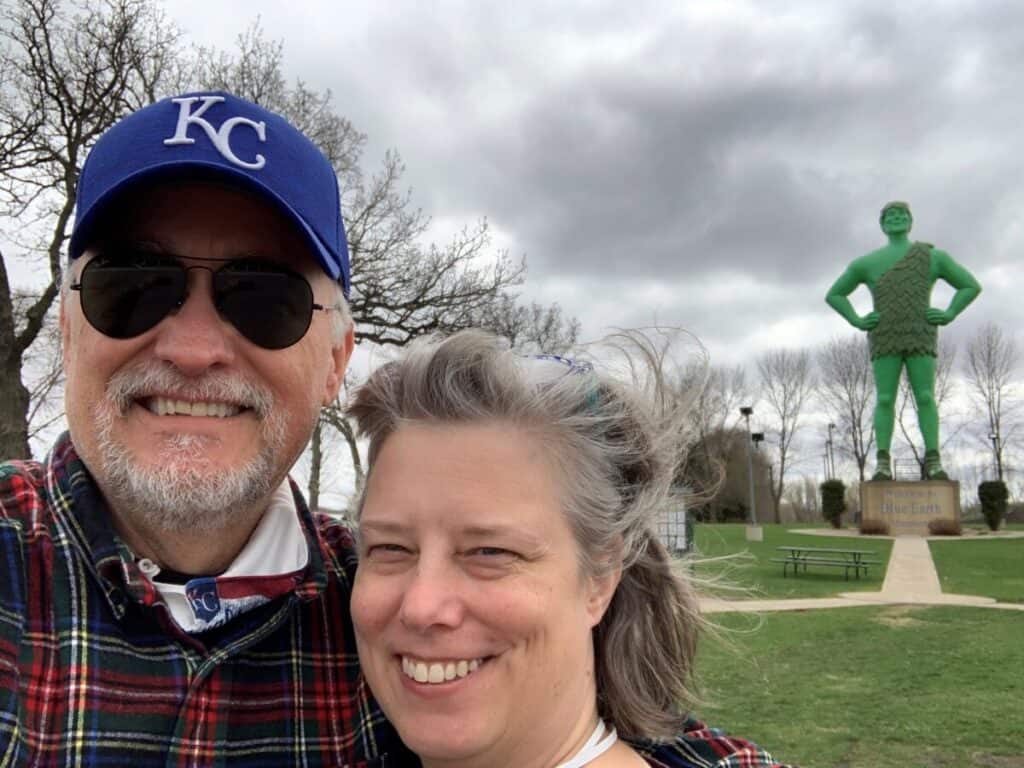
For example, we bought our used 2019 Airstream from a couple in northern Wisconsin. We live in Kansas City, so after picking up the RV near the shores of Lake Superior, we could have zipped over to the twin cities then down I-35, through Des Moines, and then home. We grabbed a phone and looked at the points of interest listed in one of our favorite apps, RV Trip Wizard. We decided that instead of taking Interstate 35 all the way south to Kansas City, we would hit Iowa then divert a bit west of I-35 to look at some interesting places along the way. As a result, we got to see where the Jolly Green Giant stands next to his fields of corn and peas, and we got to see the Shrine of the Grotto of the Redemption.
That trip was fun because we were restricted to the duration only. We traveled back to Kansas City after looking at a few optional routes and choosing the path that seemed like the most fun.
So, what’s the best way to plan a route? For us, it changes. Sometimes the best way is to plan for specific destinations, routes, and timelines. Sometimes, the best way is to simply stick our fingers in the air to see which way the wind is blowing.
Monitor Weather Trends
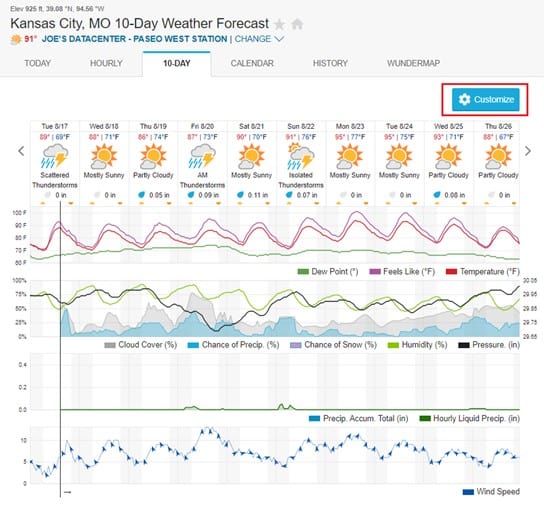
I start monitoring weather trends for our destinations about ten days out from departure. Weather sites such as WeatherUnderground.com provides customizable forecasts that can include wind direction and speed. As RVers, wind direction and speed can impact our travel day.
Charts
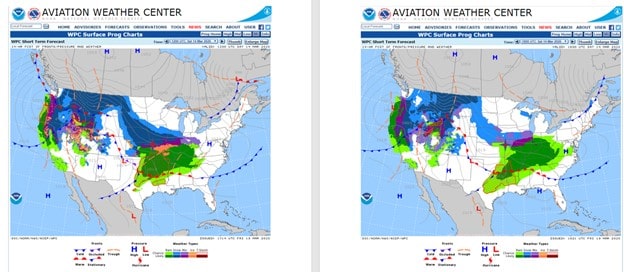
About three days out from departure, I begin to cheat and look at Surface Prog (Prognosis) Charts from the Aviation Weather Center. The charts show forecasts in six-hour to twelve-hour increments for up to six days. In the first sample below, the forecast shows fronts, but no precipitation. Isobars are the grey lines on the chart and notice that the isobars in Missouri and Iowa are widely spread.
Isobars show points having the same atmospheric pressure. The closer the isobars, the stronger the winds.
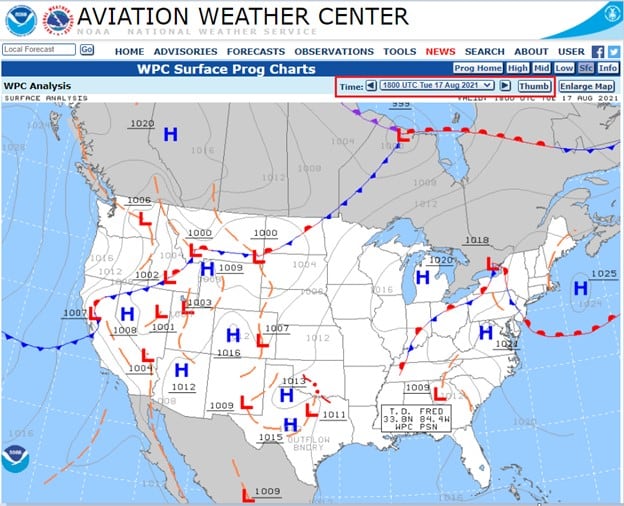
Notice the “Time” field and “Thumb” menu buttons highlighted by red boxes in the first graphic. The “Time” field allows you scroll through large-format forecasts. Clicking the “Thumb” button produces thumbnail versions of the charts which make it easier to spot the trends as shown below.
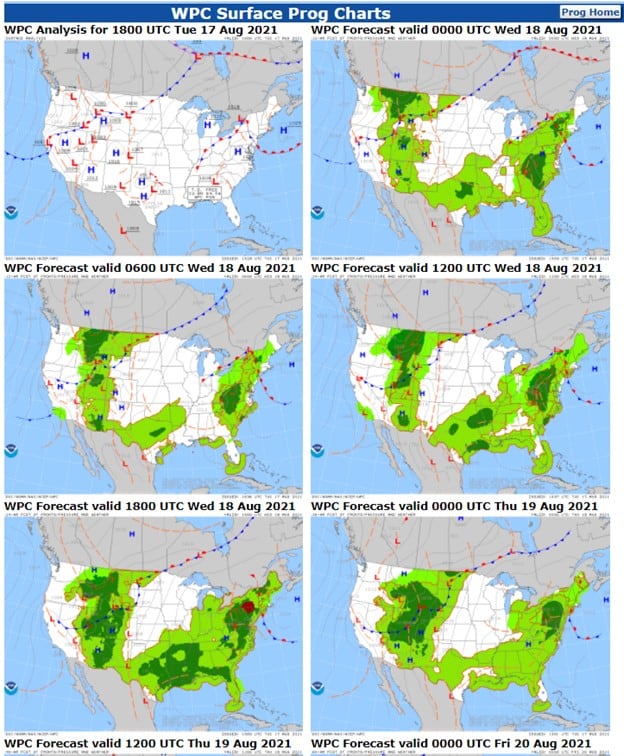
The knowledge can inform your destination and route planning decisions.
Heather and I planned our “Western Loop” tour in March. We decided to visit the Rocky Mountain State Park, Little Big Horn, Mount Rushmore, and the Badlands National Park over a 10-day period. We needed to decide on whether to depart Kansas City to the north for a counterclockwise loop or depart west for clockwise. The Surface Prog charts informed our decision.
Below, the chart on the left shows the precipitation forecast from a winter storm near the time of our planned departure. The chart on the right shows the forecast six hours later. We live roughly where the red star is in northwestern Missouri.
If we took the north route (counterclockwise), then we were going to stay in snow, or an ice-snow mix for a good portion of our first day of travel. If we departed to the west for the clockwise route, we would drive in snow for a while, but we would drive into clearing conditions as the storm pressed eastward. We decided on the western route and that was the right decision.
Identify What is Really Needed
As you know we are new to RVing, so we are still learning the difference between what we need and what we think we need. For our first trips, we packed the back end of my Ram 2500 full of things like big grills, extra propane tanks, tables, chairs, tools, pillows, and suitcases full of clothes. Somewhere between those first trips and today, we learned we did not need a lot of it. We learned that we could leave some of it at home and still have a really good time on the road.
Unnecessary stuff takes up space (no kidding, Sherlock). Packing it up, removing it from the back of the truck, rearranging, and returning it to the truck gobbles up leisure time, too. It also seems that the stuff we do not need floats to the top of the load burying the things that we do so, we began to identify the items we used regularly and whether the other items were worth taking along on future trips.
We found that packing was easier and took less time after deciding to leave some of our not-really-needed things home.
On the last excursion we left the grill and extra propane at home, and we cut the number of pillows down by half. We changed the types of clothes that we bring with us. Our Flying Cloud has more overhead and under-bed storage than wardrobe and we found that by bringing fewer items on a hanger and more of our folded items, packing for the trip was easier and we had more room in the trailer. I moved the tools I do not need regularly to the back of the bed (next to the cab) and the tools I need frequently next to the tailgate (there are only a few). On my next trip, I will probably leave more of my tools at home which will create even more open space in the back of the Ram.
I recognize that I will never create a packing list that is perfect for every trip because our needs change.
A trip to a family reunion in June took two long, hard days of driving and there were five adults in our little group. We needed the big Blackstone, extra propane, tables, extra chairs, and suitcases that we brought with us. Our July trip was a short two-hour drive from home, and we needed much, much less.
We are learning that one size does not fit all.
Plan a Menu
The next thing we do for our trip is to think about what we’re going to eat for the duration, and of course, we made a couple of mistakes along the way. The first couple of times we went out we imagined that we were going to eat like we do at home. So, we took a wide variety of food, and we took much more of it than we really needed.
Over time, we discovered that our diet is not as variable on the road as at home and we noticed that the limited space inside an RV made it a bit more difficult to put complex meals together. Because we don’t have a dishwasher, it took longer to clean up, too. We do not need as many items on the road as we do at home (at least for now) and we learned that we could prep a lot of food in advance to make cooking in the RV much easier.
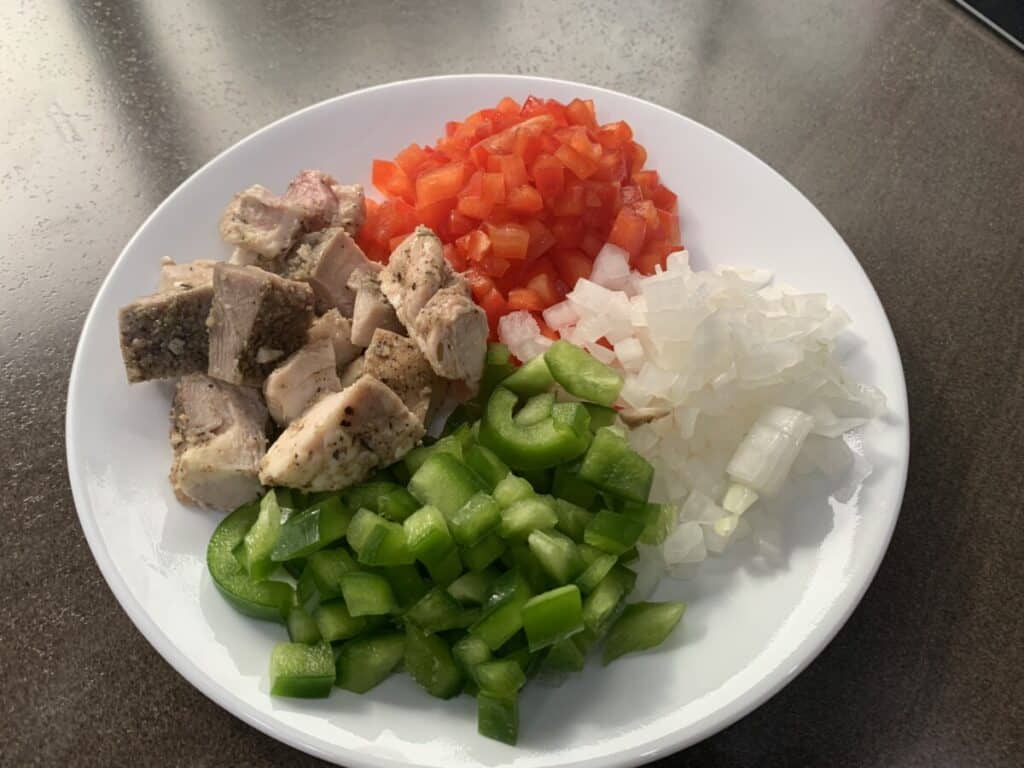
We dice onions, green peppers, red peppers and sometimes, Spam or other meats. We will season and grill chicken breasts or steak for fajitas at home just before the trip. This picture shows oven roasted chicken thighs and slices of pork shoulder marinated in a homemade al pastor sauce that I blackened in a skillet for small, easy street tacos.
We shred lettuce and cabbage and put all of that into zip top bags that store easily inside the RVs fridge.
A quick trip to the grocery store for eggs, shredded cheese, and canned items that we use for easy meals completes our pantry-packing.
Easy meals include cans of pinto and black beans with homemade re-fried bean seasoning to go with the street tacos described below. We packed some boil-in-a-bag rice, a couple of cans of red beans, andouille sausage, and Cajun seasoning. When we add the diced onion and bell pepper, we have a quick and easy quick red beans and rice meal.
This is the menu from our last trip…

- Corned beef hash crisped in a skillet and topped with a sunny side up egg
- Spanish tortilla using a can of sliced new potatoes crisped in a skillet, six eggs whisked together with onion, bell pepper, and cheese (shredded cheddar or cotija), and cooked slowly on the burner. We can bake the tortilla in the oven, too.
- Street tacos using corn and flour tortillas, grilled chicken or pork, al pastor with pineapple, onion, bell pepper, lettuce, red cabbage, lime-crema, and a side of refried beans using my homemade seasoning mix.
- Red beans and rice with diced onion, bell pepper, andouille sausage, and seasoned with Cajun spices.
All of that prep work makes menu planning and cooking in the RV pretty easy. We had lots of leftovers, too, and it was easy to clean up.
Complete the rig’s preventive maintenance items prior to departure
I should note here that I am an affiliate for some of the products mentioned below. I could be an affiliate for many products but, the links below are for products that I actually use, like, and recommend. By using my links, you help support this website.
With that, here are the general, pre-departure checklist items that I validate before a trip:
- Oil/Fuel Filter life remaining
- Fluid levels (transmission, windshield washer fluid)
- Tow vehicle tire condition and pressure
- Trailer tire condition and pressure
- Refrigerator operation
- Propane/GasStop function
- Fuel/DEF
- Fresh Water
- GCVW (gross combined vehicle weight)
I like to check a few things before every trip. First, I make sure that any upcoming maintenance on my truck is taken care of, so I don’t have to worry about it on the road. I do simple things like checking the time left on my oil and fuel filter, diesel and DEF levels, and overall condition of my tires.
Then, I flip on the trailer tire pressure monitor system (TTPMS) to make sure that the wireless monitor is charged and that the sensors are working (image to the right is a paid link).
Most of the time, I know that my rig is well within its weight limits so I do not always check it (perhaps I should). When something changes, however, such as when we take other family members along with us and pack heavy, I will go to a CAT scale and weigh my truck fully loaded [see how to get your weight on a CAT scale here]. Then, I pick up my trailer and reweigh the entire rig with full fuel, full passenger load, and with a full freshwater tank in the Airstream. That way, I can determine the gross vehicle weight, the combined gross vehicle weight, and the tongue wait. That seems like a bit of effort, true, but knowing your weight and how it is distributed is important.
For longer trips or trips with additional family on board, I want to make sure that I don’t over-pack and that the entire rig is at a safe weight.
A couple of days before the trip, I turn on the refrigerator and let it run to make sure that it is working as expected. I also want to bring the temperature down so we can load the fridge with our perishable food items. Double checking the refrigerator came in handy on one of our trips because we noticed that the fridge was operating on propane even though it was plugged into shore power. We were able to repair it before leaving home [see how I fixed the fridge here].
I make sure that we have full propane tanks, prime the GasStop valves, and look for leaks. GasStop is a valve that is easily inserted between the propane tank and regulator and will completely shut off the flow of propane when a catastrophic leak is detected. I use GasStop because for me, it is an additional layer of safety between a damaged supply line (think road debris or chaffing) and a worry-free trip.
Our Airstream propane cover has very little clearance, so we use the GasStop and pigtail shown below to complete the setup. The images below are paid links.
To check for leaks…
- Turn on the propane
- Press the gauge on the GasStop a couple of times to prime, then turn off the propane
- Monitor the gauge for a few minutes. If there is a significant needle drop within a few minutes, suspect a slow leak.
Because I’m still learning I do not know what the correct interval is for sanitizing tanks, so I sanitize every couple of months or so. The process is straightforward. It involves adding a little bit of bleach to the freshwater tank, opening the faucets and shower briefly to run water through the pipe system, and letting the hypochlorite solution sit for a while. After soaking, we run the tank dry, fill it up to rinse, empty it again, then fill it up with clean fresh water using a two-stage water filter. The water filter we use has one stage that filters 20 Micron debris, and it has a one-micron charcoal filter as well . The images below are paid links.
I should also note here that I used to block the water access to the water heater when I sanitized the tanks because I did not want to run the sodium hypochlorite solution through it. I don’t know if that is a problem, but it seemed like in some of my early reading, I read that we were not supposed to run a bleach solution through the water heater. Now, I let it run through.
Wrapping up
My prep activities will be different than yours. The important point is to create a sequence of prep activities that work for you and to just get out there!
NomadicNeighborhood is a participant in the Amazon Services LLC Associates Program, an affiliate advertising program designed to provide a means for sites to earn advertising fees by advertising and linking to Amazon.com. We also participate in other affiliate programs which compensate us for referring traffic.
Recent Posts
How to Empty a Composting Toilet: Legal considerations and more
Composting toilets divert liquid and solid waste into separate tanks, and each must be emptied independently. Liquid waste is dumped into dump stations, vault toilets, or flush toilets. Solid...
Empty a Black Tank: 16 Steps That Include a Test and Preconditioning
[wpcode id="2133"] When I first started RVing, it took me close to an hour to empty the black and gray tank. I was learning and didn’t want to make a mess, so I took my time. As I gained more...


